Table of Contents
- Introduction: Why Dermaplaning Matters
- What Dermaplaning Actually Does (How It Works)
- Skin Types and Suitability: Who Sees Results and Who Should Wait
- Perks Beyond Smoothness: Texture, Product Absorption, and Makeup Finish
- At-Home vs Professional: Key Differences and Safety Considerations
- Step-by-Step At-Home Dermaplaning Routine
- Aftercare Protocol: Calming, Hydration, and Sun Protection
- Combining Dermaplaning with Other Treatments
- Ingredient Pairings: Serums and Moisturizers That Work Best Post-Treatment
- Risks, Common Side Effects, and How to Reduce Them
- Myth-busting: Six Misconceptions About Dermaplaning
- Quick Troubleshooting: Cuts, Irritation, and When to Pause
- Visual Checklist & Safety Cheat-Sheet
- Frequently Asked Questions
Introduction: Why Dermaplaning Matters
In the vast world of skincare, few treatments offer the instant gratification of dermaplaning. Imagine revealing a brighter, smoother, and almost impossibly soft layer of skin in just a few minutes. That’s the promise of this popular exfoliation method. More than just a trend, dermaplaning is a technique that physically removes dead skin cells and vellus hair (commonly known as “peach fuzz”) from the face, paving the way for better product absorption and a flawless makeup application. This guide will walk you through everything you need to know, from the science behind it to a safe at-home routine, helping you achieve that coveted glow without the confusion.
What Dermaplaning Actually Does (How It Works)
At its core, dermaplaning is a method of physical exfoliation. It involves using a sterile, single-edge blade—either a surgical scalpel in a professional’s hands or a specially designed facial razor for at-home use—to gently scrape the surface of the skin. The blade is held at a 45-degree angle and stroked lightly across the skin.
This single action accomplishes two things simultaneously:
- Exfoliation: It removes the outermost layer of dead skin cells (the stratum corneum), which can contribute to a dull complexion, clogged pores, and uneven texture.
- Hair Removal: It temporarily removes the fine vellus hairs on the face. While these hairs are typically light and soft, their removal creates a smoother canvas.
By clearing this surface debris, dermaplaning triggers the skin’s natural cell regeneration process, promoting a healthier and more radiant appearance over time. According to the American Academy of Dermatology Association, it’s an effective way to rejuvenate the skin with minimal downtime.
Skin Types and Suitability: Who Sees Results and Who Should Wait
Dermaplaning is celebrated for its versatility, but it’s not a one-size-fits-all solution. Understanding your skin type is crucial for determining if this treatment is right for you.
Who Benefits Most?
- Dry or Dehydrated Skin: By removing the barrier of dead cells, dermaplaning allows hydrating products to penetrate more effectively.
- Mature Skin: It can help diminish the look of fine lines and improve skin texture, giving a more youthful glow.
- Normal or Combination Skin: Individuals with generally balanced skin can enjoy the brightening and smoothing effects.
- Sun-Damaged Skin: It can help reduce the appearance of minor hyperpigmentation and rough texture caused by sun exposure.
Who Should Wait or Avoid It?
- Active Acne: Dermaplaning over active pustules or cysts can spread bacteria and worsen breakouts. Wait until your skin is clear.
- Rosacea or Eczema: This treatment can be too stimulating for highly sensitive or inflamed skin, potentially causing a flare-up.
- Highly Reactive or Sensitive Skin: If your skin easily turns red or becomes irritated, proceed with extreme caution or opt for a gentler exfoliation method.
- Open Wounds or Lesions: Never perform dermaplaning over broken skin.
Perks Beyond Smoothness: Texture, Product Absorption, and Makeup Finish
The most immediate result of dermaplaning is silky-smooth skin, but the advantages go much deeper.
- Enhanced Product Absorption: With the top layer of dead skin and peach fuzz gone, your expensive serums and moisturizers can penetrate more deeply and work more efficiently. This means you get more value and better results from your existing skincare routine.
- Flawless Makeup Application: Makeup, especially foundation, glides on effortlessly over a dermaplaned face. It sits closer to the skin instead of clinging to fine hairs and dry patches, preventing a “cakey” or uneven finish.
- Brighter, More Even-Toned Complexion: The removal of dead skin cells instantly reveals the newer, more radiant skin underneath. Over time, consistent exfoliation can help fade the appearance of post-inflammatory hyperpigmentation (dark spots).
At-Home vs Professional: Key Differences and Safety Considerations
You can achieve great results with both at-home and professional dermaplaning, but it’s vital to understand the differences in tools, technique, and safety.
| Feature | Professional Dermaplaning | At-Home Dermaplaning |
|---|---|---|
| Tool | A sterile, surgical-grade scalpel. | A smaller facial razor with safety guards. |
| Practitioner | A licensed esthetician or dermatologist. | You. |
| Exfoliation Depth | Deeper, more thorough exfoliation. Removes 2-3 weeks’ worth of dead skin. | Lighter, surface-level exfoliation. More of a maintenance treatment. |
| Cost | Higher per session. | Significantly lower cost. |
| Frequency | Every 4-6 weeks. | Every 1-3 weeks, depending on skin tolerance and hair growth. |
| Safety | High, due to professional training in sanitation and technique. | Safe when done correctly, but higher risk of nicks, cuts, and irritation if improper technique is used. |
Step-by-Step At-Home Dermaplaning Routine
Ready to try it yourself? Safety and preparation are key. Follow these steps for a successful at-home dermaplaning session.
1. Gather Your Tools
- A Dermaplaning Tool: Use a high-quality, single-use facial razor specifically designed for this purpose. Avoid using eyebrow razors or other blades not meant for the face.
- A Gentle Cleanser: To start with a clean canvas.
- A Facial Oil or Dry Shave Medium (Optional): Some prefer to dermaplane on dry skin, while others find a thin layer of non-comedogenic oil helps the blade glide. If you have sensitive skin, an oil is recommended.
2. Prep Your Skin
Start with a completely clean and dry face. Double cleanse to ensure all makeup, SPF, and dirt are removed. Pat your skin until it is bone dry. Any moisture can cause the blade to skip or drag, increasing the risk of nicks.
3. Master the Technique
- Hold the Skin Taut: Use your free hand to pull the area of skin you are about to treat taut. This creates a smooth, firm surface for the blade.
- Use a 45-Degree Angle: Hold the blade at a 45-degree angle to the skin.
- Apply Short, Gentle Strokes: Use light, feathery strokes in a downward motion. Do not press hard. Let the blade do the work.
- Work in Sections: Divide your face into sections (forehead, cheeks, chin, above the lip). Avoid the delicate eye area, eyebrows, hairline, and the sides of your nose.
- Wipe the Blade: After every few strokes, wipe the blade clean on a dry cloth or cotton pad to remove buildup.
Aftercare Protocol: Calming, Hydration, and Sun Protection
Your skin is freshly exfoliated and vulnerable post-treatment. Proper aftercare is non-negotiable.
- Rinse and Soothe: Gently rinse your face with cool water or wipe with a damp cloth to remove any remaining debris.
- Hydrate and Repair: Immediately apply a hydrating, soothing serum containing ingredients like hyaluronic acid, ceramides, or niacinamide. Follow with a simple, barrier-repairing moisturizer. Avoid active ingredients like retinoids, AHAs, BHAs, and vitamin C for at least 24-48 hours.
- Sun Protection is Crucial: Your skin is now more susceptible to sun damage. Apply a broad-spectrum sunscreen with at least SPF 30 and be diligent about reapplication. This is the most critical step to protect your fresh skin.
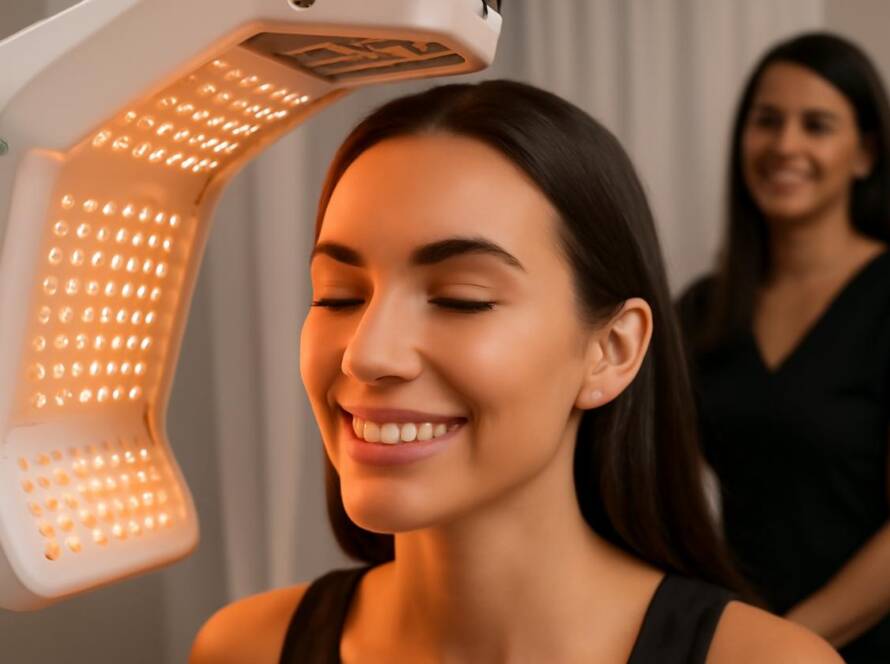
Combining Dermaplaning with Other Treatments
Timing is everything. Because dermaplaning is a form of exfoliation, you need to be mindful of how you sequence it with other treatments.
- Retinoids (Retinol, Tretinoin): Stop using retinoids for at least 3-5 days before and after dermaplaning to prevent irritation.
- Chemical Exfoliants (AHAs/BHAs): Avoid using glycolic, lactic, or salicylic acid for 3-5 days before and after your session.
- Professional Treatments: If you are getting chemical peels or laser treatments, consult your provider. Dermaplaning is often performed right before a hydrating facial or a gentle peel to enhance results, but this should only be done by a professional.
Ingredient Pairings: Serums and Moisturizers That Work Best Post-Treatment
After dermaplaning, your skin is primed for hydration and repair. Focus on ingredients that support your skin barrier.
- Hyaluronic Acid: A humectant that draws moisture into the skin, plumping and hydrating it from within.
- Ceramides: These lipids are essential for a healthy skin barrier, helping to lock in moisture and protect against environmental stressors.
- Niacinamide: Known for its calming properties, it can help reduce any post-treatment redness while supporting barrier function.
- Squalane: A lightweight, non-comedogenic oil that mimics the skin’s natural sebum, providing excellent moisture without feeling heavy.
- Peptides: These amino acid chains can help support collagen production and improve skin firmness.
Risks, Common Side Effects, and How to Reduce Them
While generally safe, dermaplaning isn’t without potential side effects, especially when performed at home.
- Redness: Mild redness immediately after treatment is normal and should subside within a few hours.
- Nicks or Cuts: The most common risk of at-home dermaplaning. Reduce this by using a fresh blade, holding skin taut, and applying light pressure.
- Irritation or Breakouts: This can happen if the tool isn’t clean, if you have active acne, or if you use harsh aftercare products. Always use a sterile blade and stick to gentle aftercare.
- Dryness: Over-exfoliation can disrupt your skin’s moisture barrier. Don’t dermaplane too frequently (no more than once a week for at-home, and every 4 weeks for professional). Research on the skin barrier emphasizes the importance of gentle exfoliation.
Myth-busting: Six Misconceptions About Dermaplaning
Let’s clear up some common myths surrounding this treatment.
- Myth: It will make my hair grow back thicker and darker. Fact: This is biologically impossible. Dermaplaning cuts the vellus hair at the surface. It does not affect the follicle itself. The hair will grow back with a blunt tip, which might feel stubbly for a short time, but it will not be thicker or darker.
- Myth: It’s painful. Fact: When done correctly, dermaplaning is completely painless. It should feel like a light scraping or tickling sensation.
- Myth: It’s the same as shaving your face. Fact: While both involve a blade, dermaplaning is more focused on exfoliation. The specific tool and 45-degree angle are designed to remove dead skin cells along with the hair, which is different from a typical razor’s function.
- Myth: It causes breakouts. Fact: Dermaplaning can actually help *prevent* breakouts by removing dead skin that can clog pores. Breakouts post-treatment are usually due to improper sanitation or using irritating aftercare products.
- Myth: You can’t do it if you have sensitive skin. Fact: Many people with sensitive skin can safely dermaplane. The key is to do a patch test, use a high-quality tool, and follow a gentle aftercare routine. However, those with conditions like rosacea or eczema should avoid it.
- Myth: It’s an anti-aging treatment. Fact: While it can reduce the appearance of fine lines by removing the top layer of dead skin, it does not stimulate collagen in the way treatments like microneedling or retinoids do. It’s more of a rejuvenation and brightening treatment.
Quick Troubleshooting: Cuts, Irritation, and When to Pause
- If you get a small nick: Stop immediately. Clean the area with a gentle antiseptic, apply slight pressure, and do not continue dermaplaning over that spot.
- If your skin feels irritated or starts to burn: Stop the treatment. Rinse your face with cool water and apply a very simple, soothing moisturizer or aloe vera. Avoid all active ingredients until the irritation subsides.
- When to take a break: If your skin feels overly sensitive, dry, or if you are experiencing a breakout, postpone your dermaplaning session until your skin has fully recovered. Skincare strategies for 2025 and beyond emphasize listening to your skin’s needs over adhering to a rigid schedule.
Visual Checklist & Safety Cheat-Sheet
Copy this checklist to keep on hand for a safe at-home session.
Pre-Dermaplaning Checklist
- [ ] Skin is free of active acne or open sores.
- [ ] Have not used retinoids or chemical exfoliants for 3-5 days.
- [ ] Face is double-cleansed and completely dry.
- [ ] Using a new, sterile dermaplaning tool.
During Dermaplaning Checklist
- [ ] Holding blade at a 45-degree angle.
- [ ] Holding skin taut with the opposite hand.
- [ ] Using short, light, downward strokes.
- [ ] Wiping the blade clean frequently.
- [ ] Avoiding eye area, lips, nose, and hairline.
Post-Dermaplaning Checklist
- [ ] Gently rinsed face with cool water.
- [ ] Applied a calming, hydrating serum (hyaluronic acid, ceramides).
- [ ] Applied a gentle, barrier-supporting moisturizer.
- [ ] Applied broad-spectrum SPF 30+ sunscreen.
- [ ] Will avoid direct sun exposure and harsh active ingredients for 48 hours.
Frequently Asked Questions
How often should I do at-home dermaplaning?
This depends on your skin’s tolerance and hair growth rate. A general guideline is every 1 to 3 weeks. It’s better to start slow (every 3 weeks) and see how your skin responds. Over-exfoliation is a real risk, so listen to your skin.
Can I wear makeup after dermaplaning?
It’s best to wait at least a few hours, or ideally until the next day, to let your skin breathe and recover. When you do apply makeup, you’ll notice it goes on much more smoothly.
What’s the white stuff that comes off my face? Is it all skin?
The buildup you see on the blade is a combination of dead skin cells, vellus hair (peach fuzz), and residual dirt or oil on the skin’s surface. It’s a satisfying sign that the treatment is working!
Is there anyone who absolutely should not try dermaplaning?
Yes. Individuals with active or cystic acne, rosacea, psoriasis, eczema, sunburn, or very inflamed and sensitive skin should avoid dermaplaning as it can exacerbate these conditions. If you are taking Accutane (isotretinoin), you should not dermaplane.