The Ultimate At-Home Pedicure Guide: A Mindful Ritual for Healthy Feet
Table of Contents
- Introduction: Why Gentle Foot Care Matters
- Understanding Foot Anatomy and Common Concerns
- Tools and Supplies for a Safe At-Home Pedicure
- Preparing the Feet: The Mindful Soak and Assessment
- Trim and Shape: Safe Nail Techniques
- Cuticle Care and Skin Smoothing
- Natural Exfoliation and Homemade Foot Mask Recipes
- Moisturizing and Massage for Lasting Comfort
- Polish Techniques and Long-Lasting Finishes
- Sanitation and Safety Best Practices
- Addressing Common Issues: Ingrown Nails, Calluses, and Fungal Signs
- Seasonal Pedicure Adjustments: Summer and Winter Routines
- Sustainable Options and Minimal Waste Swaps
- Between Pedicures: The Quick Maintenance Ritual
- When to Consult a Health Professional for Foot Problems
- Conclusion and Your At-Home Pedicure Checklist
Introduction: Why Gentle Foot Care Matters
A pedicure is often seen as a cosmetic luxury—a splash of color for sandal season. But what if we reframed it as a fundamental practice of wellness? Tending to our feet is an act of gratitude for the foundation that carries us through life. A mindful, at-home pedicure is more than just aesthetics; it’s a vital health ritual that connects us to our bodies, prevents discomfort, and provides a moment of restorative calm. This guide will walk you through creating a safe, effective, and sustainable pedicure routine that prioritizes foot health and transforms a simple task into a nourishing self-care practice.
Understanding Foot Anatomy and Common Concerns
Before we begin, let’s briefly appreciate the complexity of our feet. Each foot contains 26 bones, 33 joints, and over 100 muscles, ligaments, and tendons. They are marvels of engineering. Understanding their basic structure helps us care for them more effectively. Common concerns that a regular pedicure can help manage include:
- Dry, Cracked Heels: Caused by a lack of moisture, pressure, and friction.
- Calluses: Thickened patches of skin that form in response to repeated pressure or rubbing.
- Overgrown Cuticles: The cuticle is a protective barrier; when it grows too far onto the nail plate, it can look untidy and lift.
- Brittle Nails: Can be a sign of dehydration or simply a result of aging.
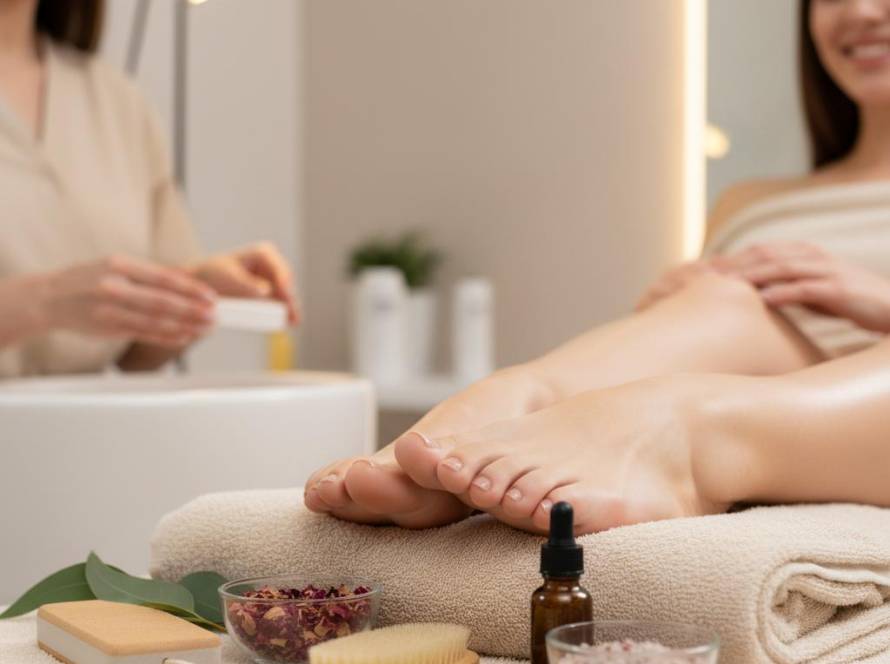
Tools and Supplies for a Safe At-Home Pedicure
Gathering the right tools makes the process smoother and safer. You don’t need a professional kit, just a few key items. Consider investing in high-quality tools that will last for years.
Essential Pedicure Toolkit
| Tool | Purpose |
|---|---|
| Foot Basin | For soaking and softening the skin. |
| Nail Clippers | For trimming toenails straight across. |
| Nail File | For smoothing and shaping nail edges. A glass or crystal file is a great long-term option. |
| Pumice Stone or Foot File | For gently exfoliating calluses and rough skin. |
| Orange Stick or Cuticle Pusher | For safely pushing back cuticles. |
| Foot Scrub or Exfoliant | For removing dead skin cells from the entire foot. |
| Moisturizer or Foot Cream | For hydrating the skin and locking in moisture. |
| Towels | For drying feet thoroughly. |
Preparing the Feet: The Mindful Soak and Assessment
The first step in any good pedicure is the soak. This is your moment to transition from a busy day to a state of relaxation. It also serves the practical purpose of softening skin and nails, making them easier and safer to work with.
Create a Soothing Soak
Fill a basin with warm (not hot) water. Avoid harsh soaps, which can be drying. Instead, enhance your soak with natural additions:
- Epsom Salts: Helps soothe tired, aching muscles.
- Essential Oils: A few drops of lavender, peppermint, or tea tree oil can add aromatherapy and antibacterial benefits.
- Oatmeal: For a soothing, skin-softening bath, place a handful of rolled oats in a muslin bag and let it steep in the water.
Soak your feet for 10-15 minutes. Use this time to breathe deeply and relax. Afterwards, pat your feet completely dry, paying special attention to the areas between your toes.
Trim and Shape: Safe Nail Techniques
Proper nail trimming is crucial for preventing painful issues like ingrown toenails. Follow these expert-recommended steps for a perfect trim.
How to Trim Toenails Safely
- Use a Clean Nail Clipper: Ensure your tool is sharp and sanitized.
- Trim Straight Across: Do not curve the edges or cut them too short. The nail should be long enough to protect the tip of your toe. The American Academy of Dermatology offers excellent nail care tips on this topic.
- Make Small Cuts: Instead of one large clip, make several small cuts across the nail to avoid splintering.
- File Gently: Use a nail file to lightly smooth any sharp corners or snags, filing in one direction to prevent weakening the nail.
Cuticle Care and Skin Smoothing
The cuticle is the thin layer of skin at the base of your nail that acts as a seal against bacteria. It’s important to treat this area with care.
Push, Don’t Cut
Never cut your cuticles. Cutting this protective barrier can lead to irritation and infection. Instead, after your soak when the skin is soft, use a clean orange stick or a soft-tipped cuticle pusher to gently push them back. If you have a hangnail (a piece of torn skin at the side of your nail), you can carefully snip it with a sanitized cuticle nipper, but avoid cutting any living skin.
For rough patches and calluses, use a pumice stone or gentle foot file on damp skin. Work in one direction with light to medium pressure. The goal is to smooth the skin, not remove it entirely. Aggressive filing can cause the skin to grow back even thicker.
Natural Exfoliation and Homemade Foot Mask Recipes
Exfoliation removes the top layer of dead skin cells, revealing softer, smoother skin underneath. You can easily make effective foot scrubs and masks with ingredients from your kitchen.
DIY Foot Scrub Recipe
Combine equal parts coarse sugar or sea salt with a carrier oil like coconut, olive, or almond oil. Add a few drops of peppermint essential oil for a cooling sensation. Gently massage this mixture over your feet in circular motions for a few minutes, then rinse with warm water.
Hydrating Foot Mask
For a deeply moisturizing treat, mash half a ripe avocado with a tablespoon of honey and a tablespoon of olive oil. Apply the mixture to your feet, wrap them in old towels or reusable cloths, and relax for 15-20 minutes before rinsing.
Moisturizing and Massage for Lasting Comfort
Hydration is the key to maintaining the results of your pedicure. After exfoliating, apply a generous amount of a thick foot cream or body butter. This is also the perfect opportunity for a simple foot massage to relieve tension and improve circulation.
Simple Foot Massage Technique
- Use your thumbs to make small circles on the sole of your foot, from the heel to the ball.
- Gently pull each toe to stretch the small joints.
- Use your knuckles to apply gentle pressure along your arch.
- Finish with long, soothing strokes from your ankle to your toes.
Polish Techniques and Long-Lasting Finishes
If you choose to apply polish, a proper technique will ensure a smooth, durable finish. Before starting, wipe each nail with a bit of rubbing alcohol on a cotton pad to remove any oils or lotion, which can prevent the polish from adhering properly.
- Apply a Base Coat: This protects your nails from staining and helps the color last longer.
- Apply Two Thin Coats of Color: Thin coats dry faster and are less likely to smudge than one thick coat. Allow each coat to dry for at least two minutes.
- Finish with a Top Coat: A good top coat adds shine, protects against chipping, and speeds up the drying process.
Sanitation and Safety Best Practices
Proper hygiene is non-negotiable for a safe at-home pedicure. Dirty tools can harbor bacteria and fungi, leading to nasty infections.
- Clean Before and After Each Use: Wash all metal tools with soap and hot water to remove debris.
- Disinfect: After washing, soak your tools in 70% isopropyl alcohol for at least 10 minutes or wipe them down thoroughly with an alcohol-soaked pad.
- Air Dry: Let tools air dry completely on a clean towel before storing them in a clean, dry place.
- Don’t Share Tools: To prevent the spread of infection, your pedicure tools should be for your personal use only.
Addressing Common Issues: Ingrown Nails, Calluses, and Fungal Signs
A regular pedicure is a great time to check in on your foot health. While you should always see a professional for serious issues, you can manage minor concerns and know when to seek help.
- Ingrown Nails: Often caused by improper trimming. If you experience pain, redness, or swelling at the side of your nail, it’s best to consult a healthcare provider. Trimming nails straight across is the best prevention.
- Calluses: Manage them with gentle, regular exfoliation. Avoid “shaver” type tools, which can easily cut the skin and cause injury or infection.
- Fungal Signs: Be aware of signs of a fungal infection, such as thickened, brittle, or discolored nails (yellow or brown), or itchy, scaly skin between the toes (athlete’s foot). The CDC provides reliable fungal infection information to help you identify potential issues.
Seasonal Pedicure Adjustments: Summer and Winter Routines
Your foot care needs change with the seasons. Adapting your pedicure routine will keep your feet comfortable year-round.
Summer Pedicure Focus
In summer, feet are often exposed. Focus on exfoliation to keep them smooth for sandals and remember to apply sunscreen to the tops of your feet to prevent sunburn.
Winter Pedicure Focus
Cold, dry air and restrictive footwear can lead to dry skin and poor circulation in winter. Shift your focus to deep hydration. Use richer creams, try overnight moisturizing masks (wear cotton socks to bed), and incorporate longer massages to boost blood flow.
Sustainable Options and Minimal Waste Swaps
As we head into 2025, mindful consumption is more important than ever. You can easily make your pedicure routine more eco-friendly.
- Choose Reusable Tools: Opt for a glass nail file and a metal or wooden cuticle pusher instead of disposable emery boards and orange sticks.
- DIY Products: Making your own scrubs and soaks reduces packaging waste.
- Water-Wise Soaking: Use only as much water as you need to cover your feet in the basin.
- Reusable Cotton Pads: Switch to washable fabric rounds for removing nail polish.
Between Pedicures: The Quick Maintenance Ritual
To prolong the benefits of your full pedicure, incorporate a quick 5-minute ritual into your weekly routine.
- Moisturize Daily: Apply foot cream every night before bed.
- Quick File: Keep a file handy to smooth any snags as soon as they appear.
- Cuticle Oil: A drop of cuticle oil on each nail can keep the surrounding skin soft and hydrated.
When to Consult a Health Professional for Foot Problems
An at-home pedicure is excellent for maintenance, but it cannot replace professional medical care. It is important to consult a podiatrist or general practitioner if you experience any of the following:
- Persistent pain in your feet or ankles.
- Signs of infection, such as redness, swelling, pus, or warmth.
- A nail that is severely ingrown or painful.
- Changes in nail color or texture that don’t improve.
- Any foot issues if you have diabetes, poor circulation, or a compromised immune system.
For general guidance on common foot ailments, the NHS offers a comprehensive resource on foot health.
Conclusion and Your At-Home Pedicure Checklist
Transforming your pedicure from a chore into a mindful ritual is a powerful act of self-care. It’s a dedicated time to care for the part of your body that works the hardest, offering a foundation of health, comfort, and confidence. By following these safe, sustainable, and health-focused practices, you can enjoy beautiful, happy feet all year long.
Printable Pedicure Checklist
- [ ] Gather and sanitize all tools.
- [ ] Prepare a warm, soothing foot soak.
- [ ] Soak feet for 10-15 minutes and perform a visual check.
- [ ] Pat feet completely dry.
- [ ] Trim nails straight across.
- [ ] Gently file nail edges smooth.
- [ ] Gently push back cuticles.
- [ ] Exfoliate rough skin with a pumice stone or foot file.
- [ ] Use a foot scrub to polish the skin.
- [ ] Rinse and dry feet again.
- [ ] Apply moisturizer and perform a relaxing foot massage.
- [ ] Cleanse nails with alcohol to prep for polish (optional).
- [ ] Apply base coat, two coats of color, and a top coat (optional).
- [ ] Allow ample time to dry.
- [ ] Clean and store all your tools for next time.